Install Olares on PVE via the script
Proxmox Virtual Environment (PVE) is an open-source virtualization platform based on Debian Linux. This guide explains how to install Olares in a PVE environment using the provided installation script.
Not for production use
Currently, Olares on PVE has certain limitations. We recommend using it only for development or testing purposes.
Having trouble?
If you run into any issues, submit a GitHub Issue and include your platform, installation method, and error details.
System requirements
Required specifications
- CPU: At least 4 cores.
- RAM: At least 8 GB of available memory.
- Storage: At least 200 GB of available SSD storage.
SSD required
The installation will fail if an HDD (mechanical hard drive) is used instead of an SSD.
- Supported systems: PVE 8.2.2
Version compatibility
While these specific versions are confirmed to work, the process may still work on other versions. Adjustments may be necessary depending on your environment. If you meet any issues with these platforms, feel free to raise an issue on GitHub.
Optional hardware
A GPU is not required to install Olares, but is necessary for most AI applications. Only NVIDIA GPUs are supported.
- Architecture: Turing or newer (GTX 16xx, RTX 20xx, 30xx, 40xx, 50xx series, and later).
INFO
GPUs with older architectures are not recognized by Olares. AI applications that require GPU access will not run.
- VRAM: At least 8 GB recommended. Even on a supported GPU, limited VRAM will prevent many AI applications from running.
Not sure if your GPU is supported?
Run the following command and check the code name prefix in the output:
lspci | grep -i nvidiaExample output:
3b:00.0 VGA compatible controller: NVIDIA Corporation AD102 [GeForce RTX 4090] (rev a1)The code name prefix maps to GPU architecture as follows:
| Code name prefix | Architecture | Supported |
|---|---|---|
| GB | Blackwell | ✓ |
| AD | Ada Lovelace | ✓ |
| GA | Ampere | ✓ |
| TU | Turing | ✓ |
| GP | Pascal | ✗ |
| GM | Maxwell | ✗ |
You can also verify against the full compatible GPU list from the NVIDIA open driver repository.
PCI passthrough required
To use the GPU within Olares on PVE, you must configure PCI passthrough first. Refer to Configure GPU passthrough in PVE for instructions.
Install on PVE
In PVE CLI, run the following command:
curl -fsSL https://olares.sh | bash -Root user password
During the installation, you may be prompted to enter your root password.
Errors during installation?
If an error occurs during installation, use the following command to uninstall first:
olares-cli uninstall --allAfter uninstalling, retry the installation by running the original installation command.
Prepare Wizard URL
At the end of the installation process, you will be prompted to enter your domain name and Olares ID.
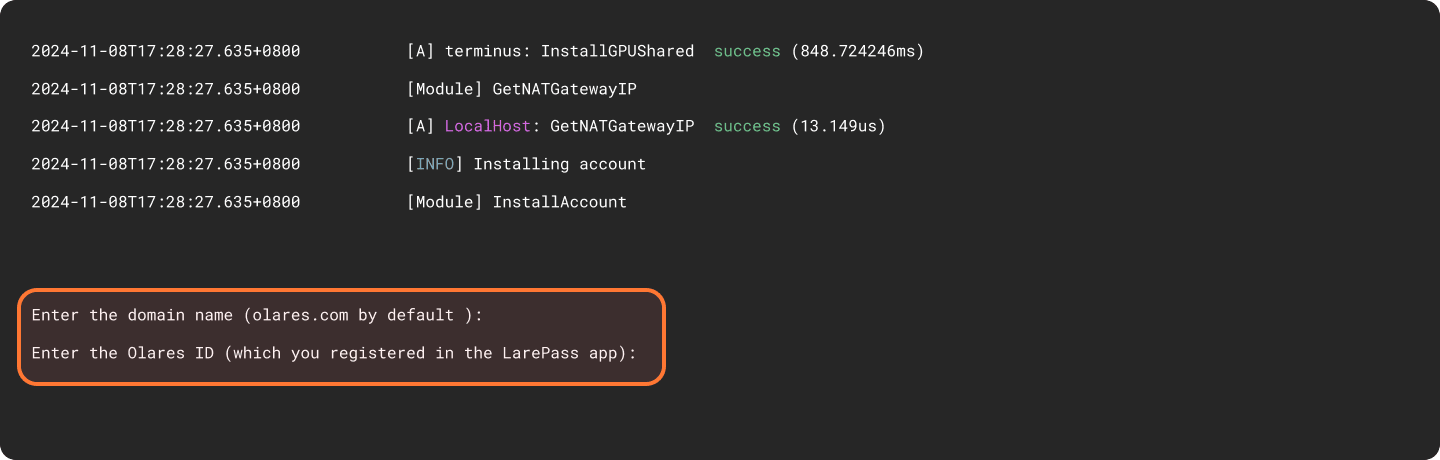
For example, if your full Olares ID is [email protected]:
- Domain name: Press
Enterto use the default domain name or typeolares.com. - Olares ID: Enter the prefix of your Olares ID. In this example, enter
alice123.
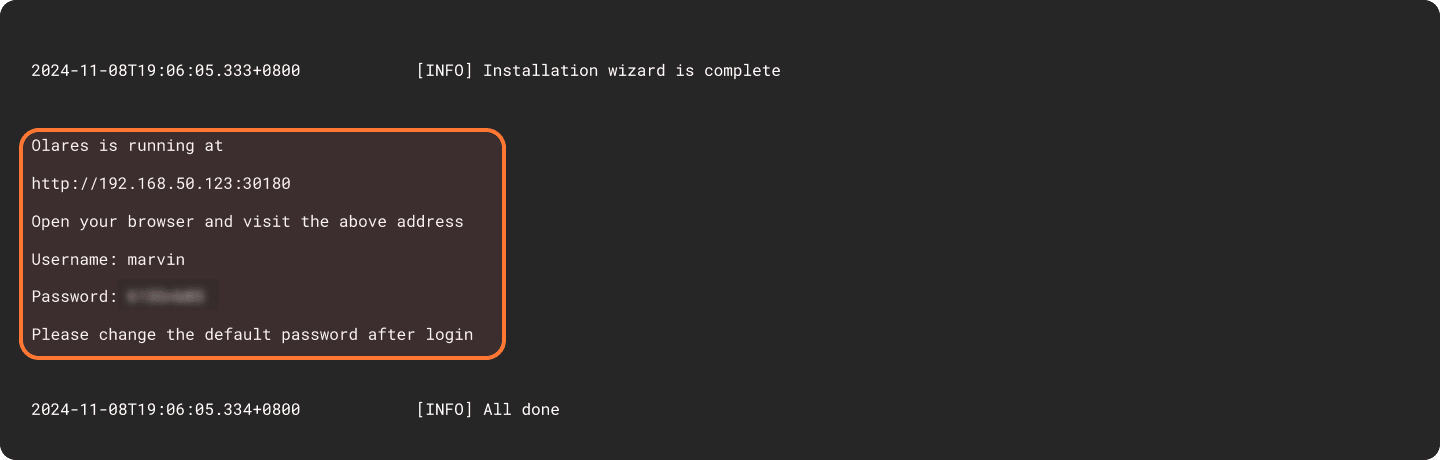
Upon completion of the installation, the initial system information, including the Wizard URL and the initial login password, will appear on the screen. You will need them later in the activation stage.
Activate Olares
Use the Wizard URL and initial one-time password to activate. This process connects the Olares device with your Olares ID using LarePass.
Enter the Wizard URL in your browser. You will be directed to the welcome page. Press any key to continue.

Enter the one-time password and click Continue.

Select the system language.

Select a reverse proxy node that is geographically closest to your location. You can adjust this later on the Change reverse proxy page.

Note
If your Olares device is connected to a public IP network, this step will be skipped automatically.
Activate Olares using LarePass app.
a. Open LarePass app, and tap Scan QR code to scan the QR code on the Wizard page and complete the activation.
Same network required for admin users
To avoid activation failures, ensure that both your phone and the Olares device are connected to the same network.

b. Reset the login password for Olares by following the on-screen instructions on LarePass.
TIP
If you reinstall Olares, the original instance becomes unavailable. To continue using the same Olares ID, you need to reactivate Olares.
After setup is complete, the LarePass app returns to the home screen, and the Wizard redirects you to the Olares login page.
Log in to Olares
Open the Olares desktop address in your browser, and press any key to continue.
On the login page, enter your Olares login password.

You will be prompted to complete two-factor verification. You can confirm the login on LarePass, or manually enter the 6-digit verification code.

INFO
The verification code is time-sensitive. Ensure you enter it before it expires.
Once you've logged in, you'll be directed to the Olares desktop.🎉
Next step: Protect your Olares ID
You're almost ready to start using Olares! Before diving in, it's crucial to ensure your Olares ID is securely backed up. Without this step, you won't be able to recover Olares ID if needed.